 |
 |
The HSV Colorspace |
Main > |
HSV Colorspace |
| |||
|
|
True colour pictures (i.e. 24 bits bitmaps, or 24/32 bits SVGA screen modes) are based on RGB tri-pixels. Each pixel has three components (Red, Green and Blue) that have each 256 possible values, giving a total of 16.777.216 possible colours. Controlling this huge amount of possibilities is almost impossible without the HSV codification, that provides an intuitive method for colour selection:
This tutorial explains in detail how this codification is established, provides the exact conversion algorithms between RGB and HSV codifications, and shows what the applications of the HSV ColorSpace can be: image processing, fractal pictures and raytracing. |
|
|
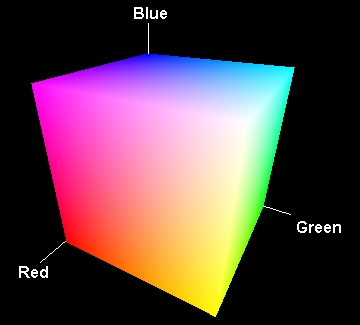
The computer is a machine, that thinks in terms of figures... We're lucky now, cause a computer knows since the eighties how to handle tri-pixels, just like a colour TV. Each pixel is made of a Red, a Green and a Blue sub-pixel, and each sub-pixel is activated by a byte, i.e. a number between 0 and 255. With these three bytes, the computer can generate 256x256x256 = 16.777.216 combinations. If we say R = x, G = y and B = z, then we can plot an RGB cube like this one. Fine, we have a huge amount of possibilities, but it is really tricky to define a precise colour by adjusting the three components. A few guidelines:
|
 |
|
Well, that's a huge amount of colours, and no palet system can handle this. Still, when you need a greyscale ramp, you define your palet with something that looks like:
You will note that when R, G and B increase, you go from black to white, going througout the whole greyscale. This simply means you get a grey tone when R = G = B, just because no colour predominates. Remember we have said "R = x, G = y and B = z". Then x=y=z corresponds to a line, the line that goes from point (0,0,0) to point (255,255,255). That's the neutral axis, which is a important notion in the HSV colour space. |
|
|
What happens when the three components are not equal ? What we know is that the greater R, G and B are, the brighter the result is. The quantity of light generated by the pixel results from the sum of Red, Green and Blue that are stated by the computer. Let's turn it the other way ound: all the points that match a criteria like R + G + B = Brightness have all the same brightness. In other terms, we are looking for points that match x+y+z= V. That's a plan! We can plot the portion of the RGB Cube which is located in that plan. Of course, the point of that plan that is located on the neutral axis is grey. |
|
|
If we move the plan along the neutral axis, from the black point (0,0,0) to the white end (255,255,255), only the brightness of the pixels will change: reds are red, greens are green, and blues are blue. In the HSV colour space, that position along the neutral axis is called "Value". An equivalent notion is the luminescence (in the HSL ColorSpace). All in all, Value ranges from 0 to 1, or from 0 to 100. |
Now, let's come back to the plan we plotted above, but with different point of view. All the points have the same brightness, and we have a grey point in the middle: the point where the plan crosses the neutral axis.
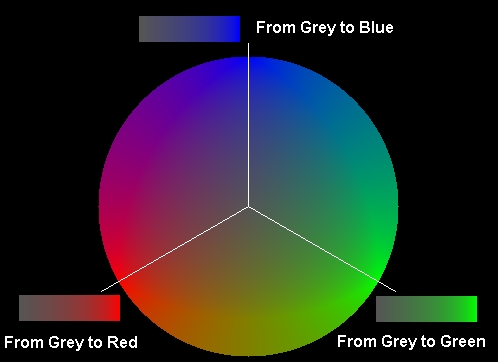
If we plot a circle, centered at the neutral axis, we see a perfect symetry around this point. The direction of each radius corresponds to a tint (red, blue, purple, yellow, etc...). In other terms, once the direction is selected (and we can define this direction by an angle ranging from 0 to 360 degrees), the global tint or "Hue" is fixed. You will never meet some green if you go in the red direction, for example.

In the HSV approach, all the tints are equivalent: red, green and blue are just three particular angles, separated by 120°. Selecting something between blue (240°) and green (120°) becomes really easy now. Yellow is just the opposite of blue, i.e. 240°-180° = 60°. Orange is located between Red (0°) and Yellow (60°), so Orange = 30°.
All in all, you can now select a tint just by this "Hue" angle logics, and define how bright the colour is with the "Value" parameter. We just miss the last notion, "Saturation", to select precisely and easily the colour we want.
When we have defined the Hue notion, we said "I start from the neutral grey point, and I select a direction". We forgot to say how far we would go...

This figure represents a disk for Value = 33%. For the three Hue angles that match Red, Green and Blue, the possible colours are represented in the corresponding colour scales.
|
The distance from the neutral axis to the considered point represents the blend between a "pure" colour and the closest greytone. Let's take an example: you want something between grey and red (that means Hue=0), and a brightness defined by Value.
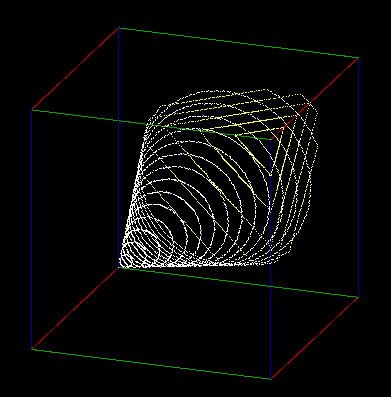
This means that all the points which are half-red and half grey are located on the line defined by x=Value*2/3, y= Value/6, z=Value/6... This is a line that starts from the origin. Extrapolate this result: all the points that correspond to a given proportion between a pure colour and the matching greytone (i.e. the greytone of the same brilliance) are located on a line that crosses the origin. In other terms, the distance (radius) between the colour and the neutral axis must be proportional to the brilliance (i.e. the "Value" of the point). This looks complicated, but it is not! The distance we look for is "D". D = Value * something... Let's call that something "Saturation". The radius between the points that are half-grey, half pure and the neutral axis (no matter what the "pure" colour is) is something like Value*50%. Well, we have defined a cone, and "Saturation" corresponds to the aperture of that cone! |
|
Here we are ! We have replaced the cartesian RGB axis system, based on three particular colours, by a conic coordinates system, where all the Hues are equal. Selecting a colour is now really simple
|
|
 |
One last concern: a cone is and endless thing, and we must fit all that stuff in a finished cube! So we must be sure that R, G and B are always between 0 and 255, even if the cone can mathematically get outside the corresponding cube.
|
Enough theory... What we need now is an algorithm to switch from RGB to HSV and reverse. Converting from RGB to HSV is easier to understand. We have R, G and B, all ranging from 0 to 255. 1) Value is proportional to R+G+B, and Value = 100 when R=G=B=255. So: Value = (Red + Green + Blue)/3*100/255 2) Saturation corresponds to the half-angle of the cone. If this half-angle is Alpha, then Tan(Alpha)= Radius/Value, where:
3) To calculate Hue, we need two orthogonal unit vectors in the plan "P" defined by R+G+B = Value. That's the plan which is orthogonal to the neutral axis, and that includes the point "N". |
|
The first vector "V" is horizontal, while "W" is located in the vertical plan that contains the neutral axis (that makes the computations easier, though it obliges to rotate the Hue angle by 150°). All in all:
| Vx = -1/SQR(2) | Wx = -1/SQR(6) |
| Vy = 1/SQR(2) | Wy = -1/SQR(6) |
| Vz = 0 | Wz = SQR(2/3) |
With these two vectors, we can identify the 3D point (R,G,B) by two cartesian coordinates in the plan "P". The argument (angle) that matches these coordinates is (Hue-150°).
The complete algorithm is thus:
DIM SHARED Red%, Green%, Blue% |
ATN(SQR(6)) corresponds to the maximum aperture of the cone inside the cube: this maximum occurs when R=255, G=0 and B=0, for example.
This routine is the most critical when one wants to use the HSV ColorSpace. The conversion allows the programmer to "think" in HSV, while giving instructions in RGB to the machine.
The algorithm shown here provides an exact conversion. The other algorithms available from the web are a simplified version, based on a hexacone, and that have very poor results.
The basis of the conversion is the same geometry as for the RGB to HSV conversion. The main difference is that we must clip the Red, Green, and Blue parameters inside the 0-255 range.
This clipping is performed by reducing the radius (distance from the point to the neutral axis) until the point gets back at the limit of the RGB cube. Six tests must be performed, and there is no way to avoid them...
|
|
The HSV conversions can be used to adjust the global tint of a picture, without affecting the other parameters of the pixels. In this exemple, the Hue of each pixel is shifted by 60 degrees from a view to another. After six shifts, the picture comes back to its original aspect.
|
|
|
|
|
|
The HSV ColorSpace can be very powerful when one wants to plot true-colour fractal pictures. Instead of managing complex 256 colours palets, the programmer can control the three parameters directly with the fractal algorithms functions.
In this example, three different techniques were used: the external zone stripes are calculated via the classical Escape Iterations Algorithm, with a parity check that alternates the hue from one stripe to another. The Value parameter was also used to get darker stripes when getting close to the M-Set.
The inner part of the M-Set was coloured by controling the Hue parameter with another function, and since Hue is an angle, you get cyclic rainbow stripes due to the fact that the function is not limited to a 0-360° range.
The intermediate zone is controled through the value parameter, to decrease the colour from white to a pastel pink inside this mysterious zone.

|
The first pic was generated mainly to demonstrate how HSV can be powerful inside a raytracer. The sky and the ground have fixed hues, the clouds and bumpmapping being controled only by altering the Value parameter. The sphere colours are obtained directly from a 3D Perlin noise, that provides a Hue = Function(x,y,z) effect. The brilliance is globally piloted by the Value parameter, in conformance with Lambert's cosine law. That technique allows modifying the brilliance without changing the Hue nor the Saturation of a pixel. The stone in the foreground has a very low saturation that provides this grey aspect, while Value in its turn is controled by a Perlin bumpmapping. |
|
|
In the second pic, each object has a given Hue, the rest being purely controled by the Value parameter. Note that the hue of each sphere is directly controled by its angular position around the helix axis... |
|
© The Mandelbrot Dazibao - 2002/2004 |
 |