 Figure 2
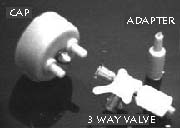
Figure 2 illustrates the components needed to use the air muscle.
Figure 2
The 3-Way air valve allows one to manually operate the air muscle.
There is a bottle top adapter, with a pressure release valve (set around (60 psi). The bottle top adapter allows one to use a standard plastic PET soda bottle for air storage. A plastic soda bottle can hold 50 psi easily. I have static tested plastic PET bottles to 100 psi. NEVER USE ANY TYPE OF GLASS BOTTLE FOR AIR STORAGE. A slight fracture in a glass bottle or dropping it accidentally may cause the bottle to suddenly explode sending tiny glass fragments all over. Plastic PET bottles elongate when over pressurized.
Figure 3 iillustrates gives a general overview of how the parts are put together. In some cases you may want to epoxy glue some components together to prevent them from popping off. For instance, if you will just be using the 3-way air valve on one bottle adapter for air muscle experiments you may want to glue the 3-way valve to the adaptor permanently.
 Figure 3
Attaching the Air Muscle to Mechanical Devices
As stated, the air muscle is made of a soft inner tube surrounded by a strong plastic mesh. The assembly is held together by metal clips on each end. The plastic mesh is looped at each end making a hole. This plastic mesh hole is very strong mechanically, and can be used to attach the air muscle to any device. Figure 4 shows a machine screw inserted through the mesh hole.
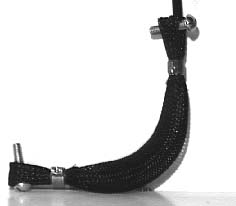 FIgure 4
| Back Page | Next Page | Robotics Home Page |Secure Order Form |